1.0 What Is WCF?
WCF stands for Windows Communication Foundations.
WCF combines the functionality from ASP.NET Web Services, .NET Remoting, Message Queuing and Enterprise Services.
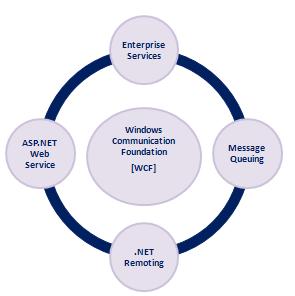
WCF provides the following features,
- Hosting For Component & Services
WCF Service can be hosted in ASP.NET Runtime, a Windows Service, a COM+ Component or just a Windows form application for peer-to-peer computing.
- Declarative Behavior
Similar to ASP.NET Web Services, attributes can be used for WCF Services e.g. ServiceContract(), OperationContract, DataContract and DataMember
- Communication Channels
Similar to .NET Remoting WCF Services are flexible in changing the channels. WCF offers multiple channels to communicate using HTTP, TCP or an IPC channel.
- Security
- Extensibility
2.0 Understanding WCF
These days we are creating the software/application which should be capable of communication with other applications as well. Communication with other application simply means either sharing/exchanging the data or the sharing the logic.
Now, this communication may be of two kinds
- Over Intranet (Same Network/Platform i.e. .NET Application to .NET Application)
- Over Internet (Cross Platform may be ASP.NET to J2EE Application)
Suppose we are writing a .NET Software with n-tier architecture in which Win Form Client needs to communicate with Server in the same network. In such case we may go for .NET Remoting for communication between Client and Server.
Suppose, once our software mentioned above is ready, we need to expose some business logic to another J2EE application. This J2EE application is supposed to use our .NET Application’s logic over WWW. In such case we will have to write new ASP.NET Web Service to expose the logic.
Picture shown below shows the limitation of .NET Remoting

WCF helps us to overcome this kind of Scenario, as WCF Service can be used as a .NET Remoting Component and ASP.NET Web Services as well.

3.0 WCF in Real Time Scenario
Suppose a 7 Star hotel has contacted you for software which will help the organization to managing the hotel’s room booking say “Room Booking System”. Apart from its own features software should be capable of
- Communication with already running software within the hotel’s network for help desk purpose. (.NET Windows Form Application)
- Communication with already running software on Tourism Office for booking of rooms. (A J2EE Application supposed to access the application over WWW)
Off course we are suppose to implement the application using Microsoft.NET Technology.
Now, as we know that in order to communicate with another .NET application within same network .NET Remoting is the best option. But as per our requirement our application should be capable of interaction with another J2EE application over WWW. So we can’t go for .NET Remoting. ASP.NET web services may work fine but the correct option for now would be WCF Service.

4.0 WCF Communication Model
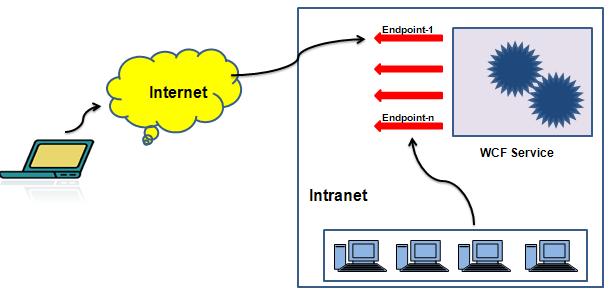
WCF follows Client-Server Architecture. Communication between Client and Server are established with the help of Endpoints exposed by the WCF Service. Endpoints are nothing but the locations defined by service through which message can be sent and received. Service may have multiple end points.
5.0 Know some terms/ Kew words
- ServiceContract
Service contracts describe the operations supported by a service, the message exchange pattern they use, and the format of each message. The service contract may be an interface or class for generating a service description. A service must implement at least one service contract. Interface or class supposed to be exposed as a service should be decorated with ServiceContractAttribute
- OperationContract
Methods in the interface or class which are supposed to be exposed as a service should be decorated with OperationContractAttribute.
- DataContract
Data contracts describe how a CLR type maps to schema. A data contract may be understood as a class or interface which is mapped to database and are supposed to exploit by WCF Service. This class or interface needs to be decorated with DataContract attribute.
- DataMember
Properties or database table columns in the DataContract class which are supposed to be used by WCF Service should be decorated with DataMember attribute.
6.0 How to Create a Sample WCF Application with VS2008?
6.1 Create/ Manage database
Before proceeding toward the WCF Service Creation, we need to create a database say, “WCF” with one table having following schema
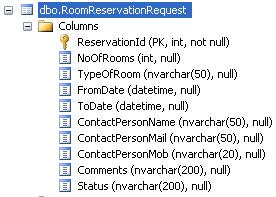
Where, ReservationId is an auto generated Primary Key column.
Note: You may also restore the backup of the database given along with the sample application.
6.2 Create WCF Service
1. Open Visual Studio
2. Go to File à New à Project
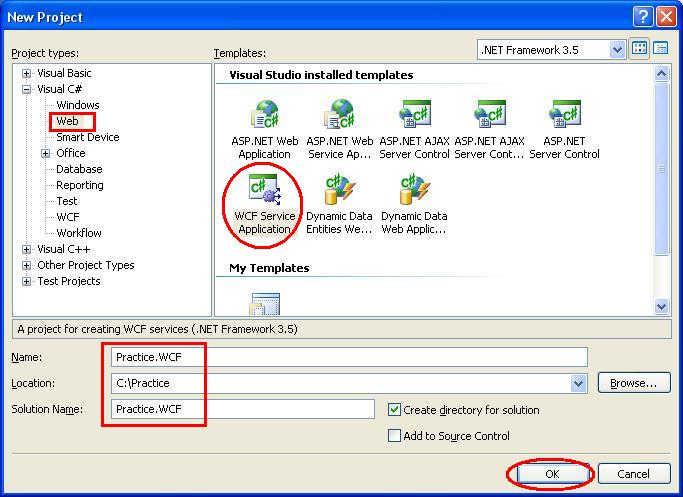
3. From the left panel, select Web node of your language VB.NET/C#.NET
4. Now among the templates you will see WCF Service Application
5. Select the same (WCF Service Application)
6. Give Suitable Name (Say Practice.WCF) and Click on OK button.
7. Modify the connection strings section of web.config file of the WCF Service
8. By default Visual Studio would create a Service and an Interface Service1.svc and IService1.cs
9. Add new class RoomReservationRequest.cs (DataContract)
10. Import the name space System.Runtime.Serialization; if not imported
11. Create property with same data type for each columns present into the RoomReservationRequest table. Decorate RoomReservationRequest.cs class with [DataContract] attribute and each property with [DataMember].
namespace Practice.WCF
{

[DataContract]

public class RoomReservationRequest

{

[DataMember]

public int ReservationId

{

get; set;

}
[DataMember]

public int  NoOfRooms

{

get; set;

}
[DataMember]

public string TypeOfRoom

{

get; set;

}
[DataMember]
public DateTime FromDate
{
get; set;
}
[DataMember]
public DateTime ToDate
{
get; set;
}
[DataMember]
public string ContactPersonName
{
get; set;
}
[DataMember]
public string ContactPersonMail
{
get; set;
}
[DataMember]
public string ContactPersonMob
{
get; set;
}
[DataMember]
public string Comments
{
get; set;
}
[DataMember]
public string Status
{
get; set;
 }

}
}
12. Add a new class RoomReservationData.cs and write two methods say ReserveRoom and GeReservations
namespace Practice.WCF

{

internal class RoomReservationData

{

private string connectionString = ConfigurationManager.ConnectionStrings["con"].ConnectionString;

internal bool ReserveRoom(RoomReservationRequest roomReservationReq)

{

SqlConnection connection = GetConnection();

string sqlCommand = "INSERT INTO RoomReservationRequest(NoOfRooms, TypeOfRoom, FromDate, ToDate, ContactPersonName, " +

"ContactPersonMail, ContactPersonMob, Comments, Status) VALUES (" +

"@NoOfRooms, @TypeOfRoom, @FromDate, @ToDate, @ContactPersonName, " +

"@ContactPersonMail, @ContactPersonMob, @Comments, @Status)";

SqlCommand command = connection.CreateCommand();

command.CommandText = sqlCommand;

command.Parameters.Add("@NoOfRooms", System.Data.SqlDbType.Int);

command.Parameters.Add("@TypeOfRoom", System.Data.SqlDbType.NVarChar, 20);

command.Parameters.Add("@FromDate", System.Data.SqlDbType.DateTime );

command.Parameters.Add("@ToDate", System.Data.SqlDbType.DateTime);

command.Parameters.Add("@ContactPersonName", System.Data.SqlDbType.NVarChar, 50);

command.Parameters.Add("@ContactPersonMail", System.Data.SqlDbType.NVarChar, 50);

command.Parameters.Add("@ContactPersonMob", System.Data.SqlDbType.NVarChar, 20);

command.Parameters.Add("@Comments", System.Data.SqlDbType.NVarChar, 200);

command.Parameters.Add("@Status", System.Data.SqlDbType.NVarChar, 200);

command.Parameters["@NoOfRooms"].Value = roomReservationReq.NoOfRooms;

command.Parameters["@TypeOfRoom"].Value = roomReservationReq.TypeOfRoom;

command.Parameters["@FromDate"].Value = roomReservationReq.FromDate;

command.Parameters["@ToDate"].Value = roomReservationReq.ToDate;

command.Parameters["@ContactPersonName"].Value = roomReservationReq.ContactPersonName;

command.Parameters["@ContactPersonMail"].Value = roomReservationReq.ContactPersonMail;

command.Parameters["@ContactPersonMob"].Value = roomReservationReq.ContactPersonMob;

command.Parameters["@Comments"].Value = roomReservationReq.Comments;

command.Parameters["@Status"].Value = roomReservationReq.Status;
int rowsEffected =0;

try

{

rowsEffected = command.ExecuteNonQuery();

}

finally

{

if (connection != null)

{

connection.Close();

connection.Dispose();

}

}

return rowsEffected > 0;

}
internal RoomReservationRequest[] GetReservations(DateTime fromDate, DateTime toDate)

{

List reservedRooms = new List();

SqlConnection connection = GetConnection();

SqlCommand command = connection.CreateCommand();

command.CommandText = "SELECT ReservationId, NoOfRooms, TypeOfRoom, FromDate" +

",ToDate, ContactPersonName, ContactPersonMail, ContactPersonMob, Comments, Status "+

"FROM RoomReservationRequest "+

"WHERE FromDate > @FromDate AND ToDate<@ToDate";
command.Parameters.Add("@FromDate", System.Data.SqlDbType.DateTime);

command.Parameters.Add("@ToDate", System.Data.SqlDbType.DateTime);

command.Parameters["@FromDate"].Value = fromDate;

command.Parameters["@ToDate"].Value = toDate;

SqlDataReader reader = null;

try

{

reader = command.ExecuteReader(CommandBehavior.CloseConnection);

while (reader.Read())

{

RoomReservationRequest roomReservationRequest = new RoomReservationRequest();

roomReservationRequest.ReservationId = Convert.ToInt16(reader[0]);

roomReservationRequest.NoOfRooms = Convert.ToInt16(reader[1]);

roomReservationRequest.TypeOfRoom = reader[2].ToString();

roomReservationRequest.FromDate = Convert.ToDateTime(reader[3]);

roomReservationRequest.ToDate = Convert.ToDateTime(reader[4]);

roomReservationRequest.ContactPersonName = reader[5].ToString();

roomReservationRequest.ContactPersonMail = reader[6].ToString();

roomReservationRequest.ContactPersonMob = reader[7].ToString();

roomReservationRequest.Comments = reader[8].ToString();

roomReservationRequest.Status = reader[9].ToString();

reservedRooms.Add(roomReservationRequest);

}

}

finally

{

if (reader != null)

{

reader.Close();

reader.Dispose();

}
if (connection != null)
{
connection.Close();
connection.Dispose();
}
}
return reservedRooms.ToArray();
}
private SqlConnection GetConnection()
{
 SqlConnection connection = new SqlConnection(connectionString);

try

{

connection.Open();

}

finally

{

}

return connection;

}

}

}
13. Declare two methods to the interface IService1 say ReserveRoom and GetReservations
namespace Practice.WCF

{

[ServiceContract]

public interface IService1

{

[OperationContract]

bool ReserveRoom(RoomReservationRequest reservationRequest);
 [OperationContract]

RoomReservationRequest[] GetReservations(DateTime fromDate, DateTime toDate);

}

}
14. Implement the Interface ISErvice1 in Service1.svc.cs class. Create instance of class RoomReservationData which we implemented in Step-12 and use the same into the implemented methods.
namespace Practice.WCF

{

public class Service1 : IService1

{

#region IService1 Members

private RoomReservationData roomReservationData = new RoomReservationData();
public bool ReserveRoom(RoomReservationRequest reservationRequest)

{

return roomReservationData.ReserveRoom(reservationRequest);

}
 public RoomReservationRequest[] GetReservations(DateTime fromDate, DateTime toDate)

{

return roomReservationData.GetReservations(fromDate, toDate);

}

#endregion

}

}
15. Now we are done with the implementation of WCF Service. Set the Service1 as Startup page. Run your WCF Application. Should get the following screen.

16. Publish the WCF Service.
- To publish the service Right Click on Practice.WCF.csproj and select the Publish option
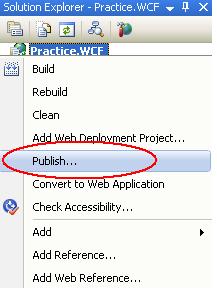
- Enter the location where you need to publish/ host the service.
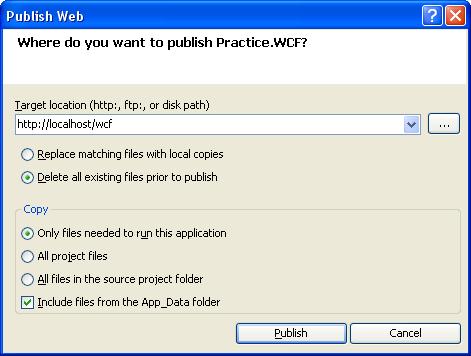
- Click on Publish button to publish the site.
17. You may check the published WCF Service by typing the URL into browser
e.g. http://localhost/wcf/Service1.svc , a page same as Step-14 will appear.
7.0 How to Consume the WCF Service?
7.1 Generate the Class and Config File using svcutil.exe
You might have noticed the message displayed while browsing the service

Now, we need to generate the classes which our Client Application would use to consume the service.
We may generate the classes/configuration with the help of tool svcutil.exe. Follow the steps to generate the Class/Config file
- Open the command prompt and Go to the location where svcutil.exe is placed. You may find the same at following place “C:\Program Files\Microsoft SDKs\Windows\v6.0A\bin”
- Write the following command and hit the “enter key” to generate the Class/Config files

- This would generate the Service1.cs and output.config files at the same location where svcutil.exe is placed i.e. “C:\Program Files\Microsoft SDKs\Windows\v6.0A\bin”
- The class generated and the config file we need to include into our client application for consuming the service.
7.2 Create Client to Consume Service
1. Open Visual Studio
2. Go to Fileà New à Project
3. Select Windows Form Application
4. Create a Form similar to below
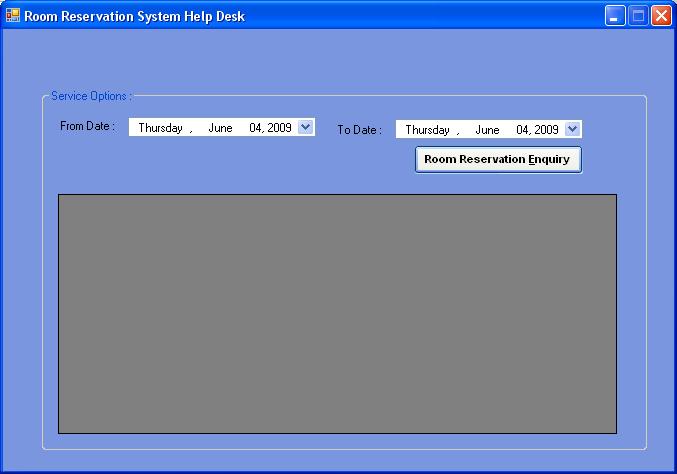
5. Include the class generated by Step iii of Section 7.1
6. Right Click on project and select the option “Add Service Reference”
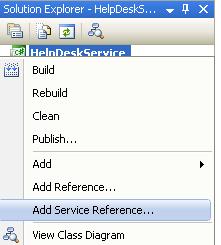
7. Enter the URL/ Address where service is hosted and hit on “Go” button to find the service. You may see the Services Methods/Logic exposed by WCF Service
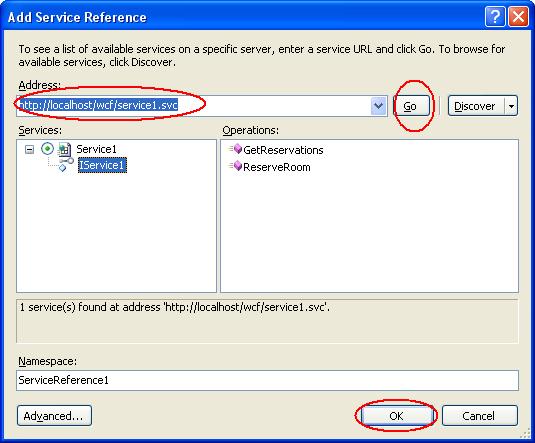
8. Click “OK” to add the service.
9. Double Click Room Reservation Enquiry button to write the logic. Make sure that you have imported the namespace of the generated class added to the project.
private void btnEnquiry_Click(object sender, EventArgs e)

{

Service1Client client = new Service1Client();

RoomReservationRequest[] reservationEnquiry = null;

reservationEnquiry = client.GetReservations(dateFromDate.Value, dateToDate.Value);
 if (reservationEnquiry.Length > 0)

{

gvReservationData.DataSource = reservationEnquiry;

gvReservationData.Visible = true;

}

else

{

gvReservationData.Visible = false;

lblMessage.Text = "Sorry data not available.";

}

}
10. When we had added the reference of the Service to the client project one configuration file also would have been added to the application i.e. App.Config. Replace the node of this file by the node of the output.config file generated into “Step- iii” of “Section 7.1”
8.0 How to Use the Source?
Unzip the file WCF.zip, you may find the following files
1. DBBackup.zip
2. Source.zip
Restore/ Create Database
Unzip the file DBBackup.zip and restore the WCF.bak file to SQL Server Database or you may create the database as suggested in Step 6.1.
Now, Unzip the file Source.zip, you may find
1. WCFService
2. WCFClient
Publish/Host Client
i. Open the directory WCFService.
ii. Double click Practice.WCF.sln file to open the solution.
iii. Modify the web.config file of Service as suggested in Step-7 of Section-6.2.
iv. Publish the service as suggested in Step-16 of Section-6.2.
Use WCF Client to consume the services
i. Open WCFClient directory.
ii. Double click HelpDeskService.sln file to open the solution.
iii. Run the solution.
iv. Select the dates and hit on Enquiry button.
Note: You may need to modify App.Config file, if you have not published the WCF Service to local machine.


