Crafting a Winning Pitch

Yesterday (Thursday 21 Aug, 2014) in a TIE program, I got opportunity to listen Mr Ravi Narayan, Director – Microsoft Ventures where Mr Narayan explained, “How to Craft a Winning Pitch”. It was really an awesome talk and quite helpful for the start-ups, that’s the reason I thought, I should share the main ingredient of his talk; hope it should be beneficial to start-ups.

Mainly he explained, when we are pitching in front of an investor or someone we are trying to join us, in 3-4 minutes of time we should try to, 1) Gain the Trust. 2) Show the credibility. 3) Create the excitement. 4) Create the curiosity to know more, and then 5) Ask for next step.
Below is the block representation of his points. Blue blocks represent the objectives i.e. our points and Green blocks next to each objective tells us, we can achieve particular objective by discussing about factors.

Crafting a Winning Pitch


Query To Get No of Records in all the Tables of a Database

declare @table_collection table(table_id int identity(1,1), table_name varchar(200), count_sql nvarchar(500), rec_count int)
declare @table_count int

insert into @table_collection
select name, 'select @rc_count = count(1) from [' + name + ']',0 from sys.tables

select @table_count = count(1) from sys.tables
declare @rec_counter int = 1

declare @temp_id int
declare @temp_count int
declare @sql nvarchar(500)

while @rec_counter<=@table_count
begin
set @temp_count = 0
select @temp_id = table_id, @sql =count_sql from @table_collection where table_id = @rec_counter

EXEC sp_executesql @sql ,N'@rc_count int OUTPUT' ,@temp_count OUTPUT
update @table_collection set rec_count = @temp_count where table_id = @rec_counter

set @rec_counter = @rec_counter + 1
end

select table_name, rec_count from @table_collection

Restart, Shut down and Log Off buttons in Windows 8

I am also new to Windows 8 and with my early experience with it I found difficult to find Shut Down, Restart and Log Off options. But got some work around to create these buttons into your Start tile.

Below are the list of commands for the same,

Shut Down: shutdown.exe /s /t 00

Restart: shutdown.exe /r /t 00

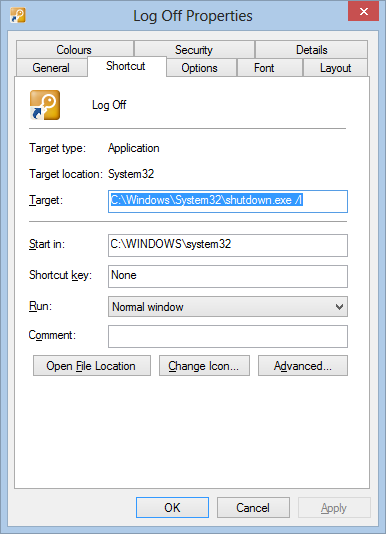
Log Off: shutdown.exe /l

Now you may follow the steps below,

1. In fact by creating simple short cut we are going to create Shut Down/ Restart and Log Off options

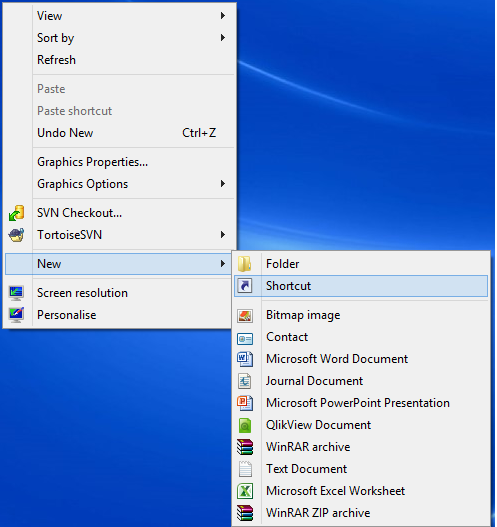
2. Right Click any where on your Desktop. (Do not right click on any Folder or File)

Shortcut

3.Select the Option Shortcut

4. A new Window would appear,

new-shorcut

5. In the text box below the label “Type the location of the item:” write below command and Click “Next” button

shutdown.exe /s /t 00

6. A new window will come-up. Here you may write the name of the shortcut. You may write here “Shut Down” and Click “Finish” button

7. Now you need to change the Icons for the same, to do this Right Click on the Short Cut you have created, Select the down most item Properties and

Properties

8. You will see “Change Icon…” button. Click the same

ChangeIcon

9. Select the desired icon and click “OK”

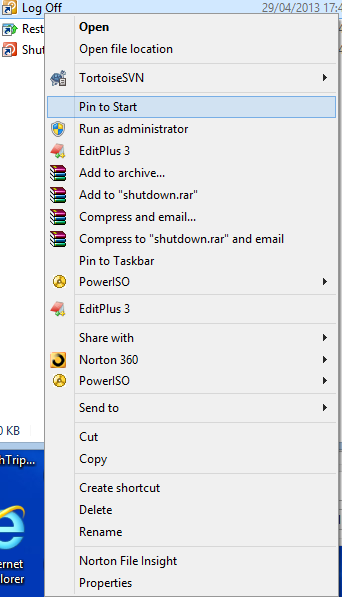
10. If you want this newly created short cut to be available on Windows 8 Tiles, Right Click on the Shortcut you have created and Select the option “Pin to Start“. Also you may choose “Pin to Taskbar” in case you want this on task bar as well.

PInToTaskbar


Repeat same steps for Restart and Log Off as well.

Now, Enjoy you have Log-Off Restart buttons at your desired place.

Cron Job to backup MySql database in cPanel

Hi,

In this post I will explain how to automate the MySql database backup using cron jobs.
In order to do the same we need to,

  1. Create a file with name backup.pl at location /home/xyz/pqr, where /home/xyz is the location for your files in cPanel and pqr is your application’s directory.
    /home/xyz is the path which you see in top left side of your cPanel under the group Stat
  2. Copy the contents below into file created in step 1 (backup.pl). This is the Perl Script which invokes mysqldump command to backup specified MySql Database.


    #!/usr/bin/perl
    use warnings;
    use strict;
    use DateTime;

    # Set connection values
    my $DATABASE = 'DATABASE_NAME';
    my $DUMP_DIR = '/home/XYZ/PQR/db_backup/';
    my $MYSQLADMIN = '/usr/bin/mysqldump';
    my ($DUMP_FILE,$DUMP_SCRIPT);
    my $DT = DateTime->today;
    ######################################
    $DUMP_FILE = $DUMP_DIR . $DATABASE . "_". $DT->date .".sql";
    if(-e "$DUMP_FILE") { unlink("$DUMP_FILE"); }
    $DUMP_SCRIPT = $MYSQLADMIN . " --opt --host=localhost --user=enter_username--password=enter_password database_name" . " > $DUMP_FILE";

    system("$DUMP_SCRIPT");

    exit(0);

    Note: Change the credentials as per your database.

  3. Create a file db_backup.php at location /home/xyz/pqr, where /home/xyz is the location for your files in cPanel and pqr is your application’s directory.
    /home/xyz is the path which you see in top left side of your cPanel under the group Stat
  4. Copy the code below to the file db_backup.php

    <?php
    $perl = shell_exec("/usr/bin/perl /home/xyz/pqr/backup.pl 2>&1");
    echo ($perl);?>;
  5. You may test process by invoking the same url
    e.g. http://www.your_application_url/db_backup.php

    Once you invoke above url, Login to cPanel, you will see a backup file created in /home/XYZ/PQR/db_backup/ with database name suffixed by date.

  6. Now you need to create a cron job in your cPanel which invokes this url periodically.
    Now you login to your cPanel
  7. Find Cron jobs within group Advanced. Click to open
  8. You will see a section with caption ‘Add New Cron Job’.
    Select the settings want to use from ‘Common Settings’ drop down list
  9. In command text box write
    GET www.your_application_url/db_backup.php> /dev/null
  10. Click on the button ‘Add New Cron Job’ to save it.

That’s all….You have created an automatic MySql Database backup Job.

Beware, Bangalore Business Peoples Have Understood that Techies lose money very easily

In my view even a single penny earned by me is valuable, not sure about you. In fact I am observing since long time that here in Bangalore we IT people never resist about any unfair cost and service.
There are two points I would like to bring into notice, and we need to resist about these
1. Bangalore Auto Rickshaw
Have you observed that in Bangalore ever that rickshaw driver takes you to your destination without asking any 20 Bucks or 50 Bucks extra? No, at least I have never. The worst part is, very rarely I have seen some one resisting or asking WHY…
At least we should ask the reason, if they (Auto Rickshaw Peoples) are important as they are offering service to us then we are also important as we are the consumers. Both of we depend on each other. I request my readers to start at least asking the reasons.
In fact our this kind of attitude is making a different kind of rating for this. We may not have any problem in paying little more but some needy person who cannot pay more may suffer from our this kind of careless attitude.

2. Bangalore Restaurants
I would like to bring into notice about the careless behavior on popular restaurant in Bangalore called Mast Kalandar. Continuously third time a take home delivery from the restaurant was missing one item. In my view anything which happens 1st time is mistake, 2nd time onwards I do not consider this as a mistake, even I have experienced this miss happening 3 times. Every time when I inform them about this they ask “Sir, I am very sorry…please tell me your address and let me know if you want any complementary dish…”
With this experience yesterday (Tuesday, 15-May-2012) was my last visit to the restaurant. In fact I would not have gone to that place with my past experience, but Pallavi Ji (I appreciate her attitude and concern) has requested me to give at least one more chance, that was the reason I was their one more time, which has been proved as a biggest mistake from my side.
I am not telling that you do not visit the restaurant…but the only thing I request that please have a look of each and every item very carefully…as there service is tremendously poor.

Earthquake in Bangalore


Note
Above screen shot was obtained from http://earthquake.usgs.gov/earthquakes/recenteqsww/Quakes/usc000905e.php

It was Around 02:20PM of 11-Apr-12, we were sitting in office after lunch. Almost every one was feeling little lazy as usual. I was just trying to concentrate on the issues reported by client, suddenly felt little shaky, thought that its still the hangover of yesterday’s beer. Again tried concentrating over the sudden tremor, mean while every one was feeling the same.
This was the time I realized that there is very less gap between life and death and remembered Anand film’s dialog,
Zindagi aur maut to upar wale (GOD the almighty) ke hath main hai Jahapanah…
Once again I thank GOD for this life and not having much disaster.

NETS3 (A .NET too for accessing Amazon S3)

1.0 Introduction

NETS3 is an open source application build using Microsoft .NET technology. This application provides access to S3 contents in an easy and user friendly manner. Users are free to use the application as well as the source code as per their needs/ requirements. Feel free to report about Any changes, feedback or bugs at ak.tripathi@yahoo.com with subject line NETS3

2.0 Background

Now a days amazon cloud has been a very popular place for the storage. Storing any content on cloud helps us to overcome the data management issue.
This application may be used for easier access to cloud and for basic learning about amazon S3

3.0 Using the code

  • Download NETS3 source code
  • Search and double click NETS3.sln file
  • Hit F5 button to run as well as debug the application.

3.1 How to Get all the buckets?

private DataTable GetAllBuckets()
{
	DataTable buckets = new DataTable();
	try
	{
		using (AmazonS3Client _s3Client = 
		
new AmazonS3Client(AccessKeyId, SecretAccessKeyId)) { ListBucketsResponse response = _s3Client.ListBuckets(); buckets.Columns.Add(new DataColumn("Name")); buckets.Columns.Add(new DataColumn("CreationDate")); DataRow row; //Loop through the records obtained to create a data table foreach (S3Bucket bucket in response.Buckets) { row = buckets.NewRow(); row[0] = bucket.BucketName; row[1] = string.Format("{0:dd-MMM-yyyy hh:mm:ss}", Convert.ToDateTime( bucket.CreationDate)); buckets.Rows.Add(row); } } } catch (Exception err) { MessageBox.Show("Error Occured" + Environment.NewLine + err.Message); } return buckets; }

3.2 How to get content(s) of any bucket?

using (AmazonS3Client _s3Client = 
	
new AmazonS3Client(AccessKeyId, SecretAccessKeyId)) { ListObjectsRequest listObjectReq = new ListObjectsRequest(); listObjectReq.WithBucketName(bucketName); ListObjectsResponse resp = client.ListObjects(listObjectReq); data.Columns.Add(new DataColumn("Key")); data.Columns.Add(new DataColumn("LastModified")); data.Columns.Add(new DataColumn("ETag")); data.Columns.Add(new DataColumn("Owner")); data.Columns.Add(new DataColumn("Size")); data.Columns.Add(new DataColumn("StorageClass")); DataRow row; //Loop through the objects obtained to create a data table foreach(S3Object obj in resp.S3Objects) { row = data.NewRow(); row["Key"] = obj.Key; row["LastModified"] = string.Format("{0:dd-MMM-yyyy hh:mm:ss}", Convert.ToDateTime( obj.LastModified)); row["ETag"] = obj.ETag; row["Owner"] = obj.Owner != null ? obj.Owner.DisplayName : ""; row["Size"] = obj.Size.ToString(); row["StorageClass"] = obj.StorageClass; data.Rows.Add(row); } }

3.3 How to create new bucket?

using (AmazonS3Client _s3Client = 
new AmazonS3Client(AccessKeyId, SecretAccessKeyId)) { PutBucketResponse response = _s3Client.PutBucket(new PutBucketRequest().WithBucketName(bucketName)); }

3.4 How to Upload content to a bucket?

using (AmazonS3Client s3Client = new AmazonS3Client(AccessKeyId, SecretAccessKeyId))
{
	//Create a unique id for the file 
	string fileName = "C:\Temp\SomeImage.png";
	string key = Guid.NewGuid().ToString() + Path.GetExtension(fileName);

	 PutObjectRequest request = new PutObjectRequest();
	request.WithBucketName(bucketName)
	.WithCannedACL(S3CannedACL.PublicRead)
	.WithKey(key).InputStream = StreamFile(fileName);

	S3Response response = s3Client.PutObject(request);

}

private Stream StreamFile(string fileName)
{
	Byte[] byteArray = File.ReadAllBytes(fileName);            
	MemoryStream mStream = new MemoryStream();
	mStream.Write(byteArray, 0, byteArray.Length);
	return mStream;
}

3.5 How to Download content from any bucket

private bool DownloadFile(string bucketName, string key)
{
	string destination = "C:\Temp\";

	 if (!Directory.Exists(destination))
                Directory.CreateDirectory(destination);

	using (AmazonS3 _s3Client =
Amazon.AWSClientFactory.CreateAmazonS3Client(AccessKeyId, SecretAccessKeyId)) { GetObjectRequest getObjectRequest = new GetObjectRequest().WithBucketName(bucketName).WithKey(key); using (S3Response getObjectResponse = client.GetObject(getObjectRequest)) { using (Stream s = getObjectResponse.ResponseStream) { using (FileStream fs = new FileStream( Path.Combine(destination, _fileName), FileMode.Create, FileAccess.Write)) { byte[] data = new byte[32768]; int bytesRead = 0; do { bytesRead = s.Read(data, 0, data.Length); fs.Write(data, 0, bytesRead); } while (bytesRead > 0); fs.Flush(); } } } } }

3.6 How to delete content from any bucket?

private bool DeleteFile(string fileName, string bucketName)
{
	bool isSuccess = false;
	try
	{
		using (AmazonS3 _s3Client = 
Amazon.AWSClientFactory.CreateAmazonS3Client(AccessKeyId, SecretAccessKeyId)) { DeleteObjectRequest request = new DeleteObjectRequest(); request.WithBucketName(bucketName).WithKey(fileName); _s3Client.DeleteObject(request); } isSuccess = true; } catch (AmazonS3Exception amazonS3Exception) { MessageBox.Show("Error occured-" + Environment.NewLine + "Error Code: " + amazonS3Exception.ErrorCode + Environment.NewLine + "Message: " + amazonS3Exception.Message); } return isSuccess; }

3.7 How to generate public url of any content?

private string GetPublicUrl(int expirationTime, string bucketName, string fileName, bool generateSecuredUrl)
{
	string publicUrl = "";
	using (AmazonS3 _s3Client =
Amazon.AWSClientFactory.CreateAmazonS3Client(AccessKeyId, SecretAccessKeyId)) { GetPreSignedUrlRequest request = new GetPreSignedUrlRequest(); DateTime Expiration = DateTime.Now.AddHours(expirationTime); request.WithBucketName(bucketName).WithKey(fileName).WithExpires(Expiration).WithProtocol(generateSecuredUrl ? Protocol.HTTPS : Protocol.HTTP); publicUrl = client.GetPreSignedURL(request); } return publicUrl; }

4.0 User Guide

1.0 Introduction
2.0 Technology Details
2.1 Pre-Requisites
2.2 How to Use
3.0 User Manual
3.1 Login
3.2 How to create New Bucket
3.3 How upload content to a bucket
3.4 How delete content from a bucket
3.5 How download content from a bucket
3.6 How generate URL of any content/ file
3.7 How change file download location
4.0 Feedback/ Bug Reporting


1.0 Introduction

NETS3 is an open source application build using Microsoft .NET technology. This application provides access to S3
contents in an easy and user friendly manner.


2.0 Technology Details

2.1 Pre-Requisites

Microsoft.NET Framework 3.5 or greater.

2.2 How to Use

Follow the steps below to use “NETS3”.

  1. Download the files
  2. Search for the directory Executable
  3. Search for the file NETS3.exe and double click the same to run


3.0 User Manual

3.1 Login

Run NETS3.exe

Enter Access Key Id and Secret Access Key Id and Hit login button
Successful login will redirect you to NETS3 Console, where you may do see your buckets listing and manipulate
these

3.2 How to create New Bucket

  • 3.2.1 Once you are logged in to NETS3 Console. Hit CTRL+N
    Enter the name of the bucket want to create and hit on create button
  • 3.2.2 You will receive a message box,

3.3 How upload content to a bucket

  • 3.3.1 Right Click on the bucket to which you want to upload the content
  • 3.3.2 A Context menu will appear. Click (Left Click) on the “Upload Content”. This will bring a new
    window to upload any file/ content,
  • 3.3.3 Browse the file you wish to upload. You will see the browsed files in Selected File(s) grid with
    add mark.
  • 3.3.4 Click on “Upload” button to upload the selected content to Amazon S3.

3.4 How delete content from a bucket

  • 3.4.1 Click on the bucket from the buckets tree from which you wish to delete the content. You will
    see the files belonging to the bucket on right side grid.
  • 3.4.2 Right click on the file/ content you wish to delete,
  • 3.4.3 Click on “Delete” menu to delete the content.

3.5 How download content from a bucket

  • 3.5.1 Click on the bucket from the buckets tree present in left, from which you wish to download the
    content. You will see the files belonging to the bucket on right.
  • 3.5.2 Right click on the file/ content you wish to Download,
  • 3.5.3 Click on “Download” menu to download the content. By Default files are downloaded on your
    desktop within a folder “NETS3Downloads”. You may change this location. See section 3.7 to
    know how this path is changed.

3.6 How generate URL of any content/ file

  • 3.6.1 Click on the bucket from the buckets tree present in left, from which you wish share the content
    or file. You will see the files belonging to the bucket on right side.
  • 3.6.2 Right click on the file/ content you wish to Share
  • 3.6.3 Click on “Generate Url” menu to generate the url to share the content or file.
  • 3.6.4 You may generate the secured url as per your requirement by varying Expiration Time, http or
    http etc. Url may be given to any of your friend to access the contents for certain time.

3.7 How change file download location

  • 3.7.1 Go to Setting >> Preferences
  • 3.7.2 Browse the location where you wish to save the files downloaded.

4.0 Feedback/ Bug Reporting

Feel free to write your suggestion, feedback, user experiences to ak.tripathi@yahoo.com with subject line NETS3

parseJSON giving error Microsoft JScript compilation error: Syntax error

If you are getting the exception message Microsoft JScript compilation error: Syntax error
for $.parseJSON method.

In order to rectify the issue follow the steps below,

  1. Probably this issue is caused by the jSon string you are trying to parse
     var tmpJSon = '[{&quot;SectionId&quot;:1132,&quot;ModifiedBy&quot;:0,&quot;SectionName&quot;:&quot;

    As you see above jSon string contains &quot;

  2. Before calling $.parseJSON or jQuery.parseJSON function of jQuery remove the encoding, i.e. replace &quot; by ”
    var tmpJSon = tmpJSon .replace(/&quot;/ig, '"');
    var jSonObject = $.parseJSON(tmpJSon );
  3. Most probably this time you may not the exception i.e. Microsoft JScript compilation error: Syntax error